
Make these cute wafer pencil cookies for an easy and delicious back-to-school treat that will delight kids and adults alike. Perfect for classroom snacks or fun lunchbox surprises, these adorable cookies combine the sweet crunch of vanilla wafers with colorful chocolate, making them a standout treat for any occasion. Whether you’re celebrating the start of the school year or just want to impress your friends with a creative snack, wafer pencil cookies are sure to impress.

Why You’ll Love This Recipe
- Easy to Make: These wafer pencil cookies require minimal ingredients and are quick to assemble, making them perfect for busy parents.
- Visually Appealing: Their unique pencil shape is not only cute but also a great conversation starter at parties or school events.
- Customizable Colors: You can easily switch up the colors of the chocolate melting wafers to match any theme or occasion.
- Fun Activity: Creating these cookies can be a fun family activity, encouraging creativity and teamwork in the kitchen.
- Great for Any Occasion: Whether it’s back-to-school time or a birthday party, these treats fit right in!
Tools and Preparation
Before diving into this delightful recipe, gather your tools and prepare your kitchen for some fun! Having everything ready will help make the process smoother.
Essential Tools and Equipment
- Piping bags
-
5 piping tip (or #3 if preferred)
- Microwave-safe bowl
- Baking sheet
Importance of Each Tool
- Piping bags: Essential for creating precise designs with melted chocolate, ensuring your cookies look professionally made.
- # 5 piping tip: This size allows for easy flow of melted chocolate while maintaining control over your designs.
Ingredients
Make these cute wafer cookie pencils for an easy and delicious back-to-school treat.
Grab This Chef Knife Now - Almost Gone!
For the Cookies
- Vanilla Wafers (we used Voortman brand)
For the Chocolate Coating
- Bright White Chocolate Melting Wafers
- Light Pink White Chocolate Melting Wafers
For Decoration
- Mini Chocolate Chip
Tools Needed
- # 5 Piping Tip and piping bag
How to Make Wafer Pencil Cookies
Step 1: Prepare the Wafer Cookies
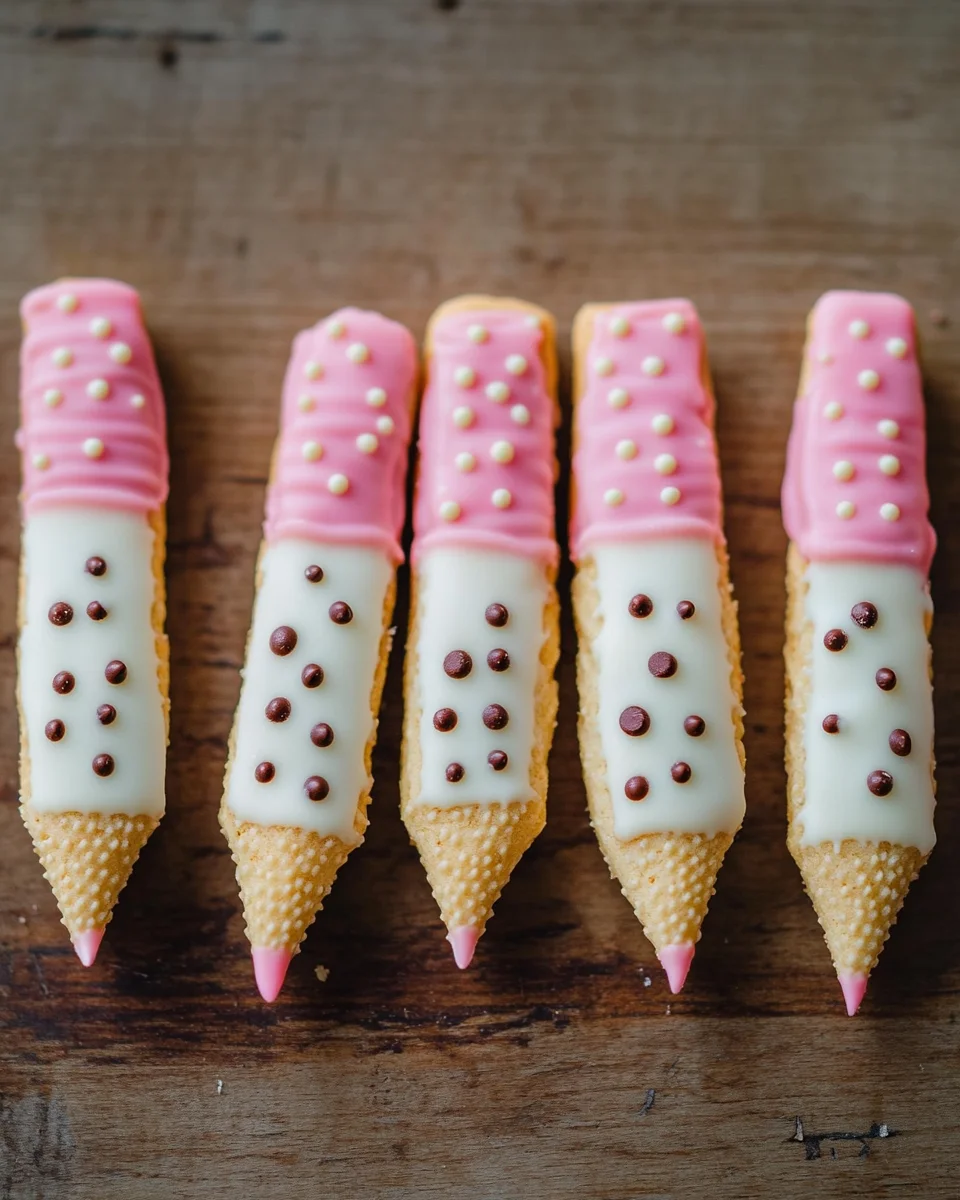
- Cut one end of each wafer cookie on both sides at the top to form a point, resembling a pencil tip.
- Melt the bright white and light pink melting wafers according to package instructions.
Step 2: Fill Your Piping Bags
- Fill separate piping bags with each color of melted wafers.
- If you prefer more control, use a smaller tip like #3 for detailed work.
Step 3: Create the Pencil Design
- Pipe melted pink chocolate into the very bottom section of each cookie to resemble an eraser.
- Gently shake the cookie to smooth out the chocolate.
- Pipe melted white chocolate into a triangle shape at the pointed end of the wafer to form the pencil tip.
- Before it hardens, add a mini chocolate chip on top as the lead of your pencil.
Enjoy creating these delightful wafer pencil cookies that are not only tasty but also visually charming!
How to Serve Wafer Pencil Cookies
Wafer Pencil Cookies are not just adorable; they also make for a delightful treat at any gathering, especially during back-to-school season. Here are some fun ways to serve these cookies that will impress both kids and adults alike.
Classroom Treats
- Individual Bags: Package each cookie in a clear bag tied with a colorful ribbon. This makes for a cute and portable snack for students.
- Decorative Platters: Arrange the cookies on a bright platter surrounded by school-themed decorations to create an eye-catching centerpiece.
Parties and Gatherings
- Dessert Table: Include Wafer Pencil Cookies on a dessert table alongside other treats. They will add a playful touch to your spread.
- Themed Snacks: Serve alongside other school-themed snacks like apple slices or juice boxes for a cohesive theme.
Special Occasions
- Back-to-School Events: Offer these cookies at back-to-school nights or celebrations. They are perfect for welcoming students and parents alike.
- Birthday Parties: Incorporate Wafer Pencil Cookies into birthday party goodie bags or as part of the cake table display.
How to Perfect Wafer Pencil Cookies
Creating the ideal Wafer Pencil Cookies is all about technique and presentation. Follow these tips to ensure your cookies look as great as they taste.
- Cutting Technique: Cut the wafers at an angle for more defined pencil tips. This helps enhance the pencil shape.
- Melting Method: Melt chocolate slowly and stir frequently to achieve a smooth consistency, which makes piping easier.
- Piping Practice: Practice piping on parchment paper first before applying it directly on the cookies. This allows you to refine your technique.
- Cooling Time: Allow melted chocolate to cool slightly before adding mini chocolate chips, ensuring they adhere well without sinking.
Best Side Dishes for Wafer Pencil Cookies
Pairing side dishes with your Wafer Pencil Cookies can elevate your dessert experience. Here are some delightful options that complement these sweet treats perfectly.
- Fruit Salad: A refreshing mix of seasonal fruits balances out the sweetness of the cookies.
- Veggie Sticks with Dip: Crunchy veggies like carrots and celery served with ranch dip offer a healthy contrast.
- Mini Sandwiches: Small sandwiches filled with cheese or deli meats make for a satisfying savory option.
- Cheese Platter: An assortment of cheeses can provide a nice flavor contrast to the sweetness of the cookies.
- Popcorn Mix: Sweet and salty popcorn can be an excellent crunchy side that pairs well with dessert items.
- Ice Cream Cups: Serve small cups of ice cream alongside cookies for an indulgent treat that everyone loves.
Common Mistakes to Avoid
Making wafer pencil cookies is fun, but common mistakes can lead to disappointing results. Here are some pitfalls to watch out for:
-
Skipping the Melting Instructions – Always follow the melting instructions on the chocolate packaging. This ensures smooth, easy piping and prevents clumping.
-
Using the Wrong Piping Tip – Choosing a piping tip that’s too small or too large can affect your design. Tip #5 works well; however, a smaller tip like #3 can also be helpful for detailed work.
-
Not Allowing Chocolate to Set – Be patient and allow the melted chocolate to set properly before handling. This helps maintain the shape of your wafer pencil cookies.
-
Overfilling the Wafer – Filling the wafer too much with chocolate can lead to overflow and messiness. Fill just enough for a clean look while still creating a fun design.
-
Ignoring Decoration Options – Don’t hesitate to get creative with decorations! Using different colors or toppings can make your cookies stand out even more.
Storage & Reheating Instructions
Refrigerator Storage
- Duration – Store in the refrigerator for up to one week.
- Container – Use an airtight container to maintain freshness and prevent drying out.
Freezing Wafer Pencil Cookies
- Duration – You can freeze these cookies for up to three months.
- Container – Place them in a freezer-safe bag or container, separating layers with parchment paper to avoid sticking.
Reheating Wafer Pencil Cookies
-
Oven – Preheat to 350°F (175°C) and warm cookies for about 5 minutes until slightly soft.
-
Microwave – Heat one cookie at a time for about 10-15 seconds for a quick warm-up.
-
Stovetop – Place cookies in a covered skillet on low heat for 1-2 minutes, checking frequently to avoid melting the chocolate.
Frequently Asked Questions
Here are some common questions about making wafer pencil cookies:
How To Make Wafer Pencil Cookies?
To make wafer pencil cookies, start by cutting one end of each vanilla wafer into a point. Melt white and pink chocolate wafers as instructed, then use piping bags to decorate each cookie like pencils.
What Can I Use Instead of Vanilla Wafers?
If you can’t find vanilla wafers, sugar wafers or similar crunchy cookies work well as substitutes for making wafer pencil cookies.
Can I Customize My Wafer Pencil Cookies?
Absolutely! Feel free to add colorful sprinkles or use different shades of melting chocolate for unique designs on your wafer pencil cookies.
How Long Do Wafer Pencil Cookies Last?
When stored properly in an airtight container, wafer pencil cookies last about one week in the refrigerator and up to three months in the freezer.
Are Wafer Pencil Cookies Suitable for Kids?
Yes! These cute wafer pencil cookies are perfect as snacks for the classroom or back-to-school treats that kids will love.
Final Thoughts
Wafer pencil cookies are not only adorable but also versatile and easy to make. They serve as delightful treats for school events or simply as fun snacks at home. Feel free to customize your creations with different colors and toppings, making each batch uniquely yours. Try your hand at these delicious cookies; they’re sure to impress family and friends alike!

Wafer Pencil Cookies
- Total Time: 0 hours
- Yield: Approximately 12 servings
Description
Wafer pencil cookies are the ultimate creative treat that combines fun and flavor in every bite. These adorable cookies are not only visually appealing but also incredibly easy to make, making them perfect for back-to-school celebrations or any festive gathering. With just a few simple ingredients, you can transform vanilla wafers into delightful pencil-shaped snacks decorated with colorful chocolate. Kids and adults alike will love the sweet crunch and playful design, making these cookies a standout centerpiece at parties or classroom events. Whether you’re looking to surprise your child with a unique lunchbox treat or impress guests at a gathering, wafer pencil cookies are sure to bring smiles all around!
Ingredients
- Vanilla wafers
- Bright white chocolate melting wafers
- Light pink white chocolate melting wafers
- Mini chocolate chips
Instructions
- Cut one end of each vanilla wafer at an angle to create a pencil tip.
- Melt bright white and light pink melting wafers according to package instructions.
- Fill piping bags with melted chocolate.
- Pipe pink chocolate on the bottom of each cookie for the eraser.
- Pipe white chocolate in a triangle shape at the pointed end for the pencil tip.
- Add a mini chocolate chip on top as the pencil lead.
- Prep Time: 15 minutes
- Cook Time: N/A
- Category: Dessert
- Method: Baking
- Cuisine: American
Nutrition
- Serving Size: 1 serving
- Calories: 100
- Sugar: 8g
- Sodium: 30mg
- Fat: 5g
- Saturated Fat: 3g
- Unsaturated Fat: 2g
- Trans Fat: 0g
- Carbohydrates: 12g
- Fiber: 0g
- Protein: 1g
- Cholesterol: 0mg
The Salad Bowls Amazon Chose and Customers Love!


Leave a Comment